Besides the NVIDIA Control Settings, the in-game settings are probably the best way to improve the performance of your system without a hardware upgrade.
For me, it’s always about maximum performance, and I also accept quality losses as long as it doesn’t negatively affect my performance.
To that end, it’s important to note that these settings are the best for my system and therefore don’t automatically work equally well for everyone because you always have to consider the settings in combination with your monitor’s settings and the NVIDIA Control Settings.
I use a BenQ XL2546 with 240Hz. A monitor that is also used by many current pro gamers, as we could determine in our analysis in this article.
If you also have a BenQ XL2546 or want to get one, then maybe my Monitor Settings will help you, especially in combination with the following In-Game Settings.
If you are also interested in my NVIDIA Control Settings, you can find them in this article.
And if you also want to optimize your Windows 10/11 settings for gaming, this article is just right for you.
I have published all my Valorant settings in this article. I think it is clear that many settings are a matter of taste or habit, but one or two others are also interested in these settings.
I achieved Immortal status with these settings and successfully participated in national and international tournaments.
So I think my settings work very well as a starting point to find your personal best settings.
Let’s go!

Note: This article was written in English. Translations into other languages may not provide the same linguistic quality. We apologize for grammatical and semantic errors.
GENERAL
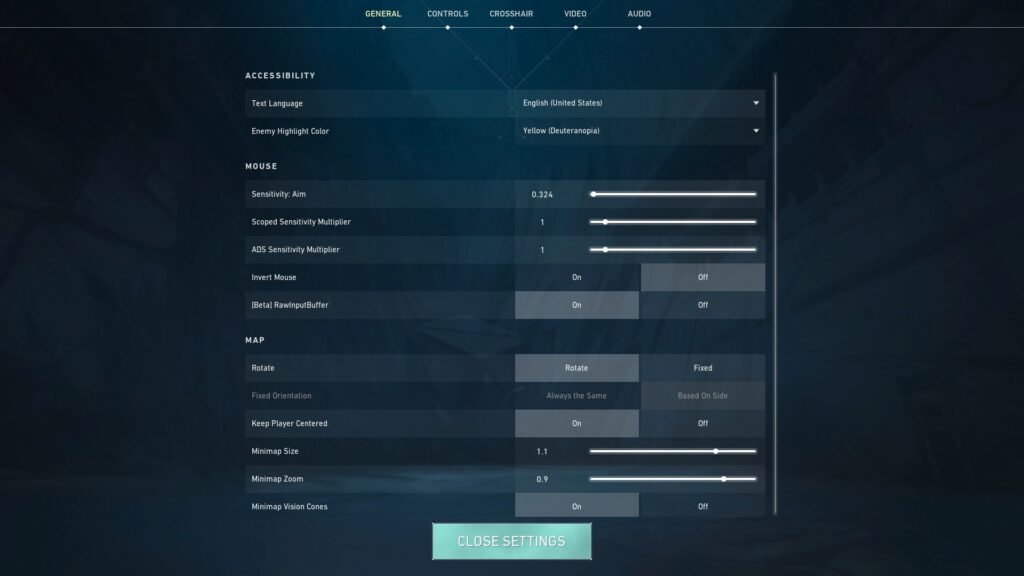
ACCESSIBILITY
| Text Language | English (United States) |
| Enemy Highlight Color | Yellow (Deuteranopia) |
Important explanations
Enemy Highlight Color: Of course, it’s a matter of taste, so you should test which color is most likely to catch your attention. For me it’s yellow.
MOUSE
| Sensitivity: Aim | 0.324 |
| Scoped Sensitivity Multiplier | 1 |
| ADS Sensitivity Multiplier | 1 |
| Invert Mouse | Off |
| [Beta] RawInputBuffer | On |
Important explanations
Sensitivity: Aim: If you are just starting with Valorant and have played another shooter before, it’s best to use our Sensitivity Converter to transfer your mouse sensitivity so you can get started immediately.
To correctly classify the sensitivity of my mouse, you need to know that I use a Logitech G Pro X Superlight mouse with 800 DPI.
If you’re wondering if you can play Valorant with a controller, check out the article below, where we discuss it in detail:
[Beta] RawInputBuffer: You should activate this setting so that the signals of your mouse are passed directly and unfiltered to the game. It reduces the input delay of your mouse.
MAP
| Rotate | Rotate |
| Keep Player Centered | On |
| Minimap Size | 1.1 |
| Minimap Zoom | 0.9 |
| Minimap Vision Cones | On |
| Show Map Region Names | Always |
Important explanations
In my opinion, the map settings are a matter of taste. Therefore, it’s best to test all the variants to find your ideal settings.
PRIVACY

| Hide My Name from Players Outside My Party | On |
| Use Generic Names for Players Outside My Party | Off |
| Auto-Reject Friend Requests | Off |
| Only Allow Party Requests from Friends | Off |
Important explanations
Hide My Name from Players Outside My Party:
I really like being anonymous to my opponents. This setting is especially important for streamers to prevent stream sniping.
OTHER
| First Person Handedness | Right |
| Always Show Inventory | On |
| Player Loadouts Always Visible | Off |
| Cycle to Next/Prev Weapon Wraps Inventory | Off |
| Cycle to Next/Prev Weapon includes Spike | Off |
| Show Mature Content | On |
| Show Corpses | Off |
| Show Blood | Off |
| Instability Indicators | On |
| Network Buffering | Minimum |
| Show Bullet Tracers | On |
| Show Spectator Count | On |
| Use Team Color for Crosshair Color | Off |
| Hide User Interface In Game | Off |
| Hide First Person Arms (Observers Only) | Off |
| Show Full Screen Blind for Observers | Off |
| Team Colors Affect HUD for Observers | Off |
| Show Player Keybinds on Minimap | On |
| Show Player Keybinds on Megamap | Off |
| Use fullscreen Megamap with opaque background | Off |
| Observers see agent handedness based on team | Off |
| Hide the Spectated Agent Portrait for Observers | Off |
| Observer Free Camera Fast Speed | 0.6 |
| Observer Free Camera Slow Speed | 0.3 |
| Observer Press To Toggle Scoreboard | Off |
Important explanations
Again, many settings are purely a matter of taste except “Network Buffering”.
Network Buffering: Minimum should be set here in any case so that the transmission of data packets between you and the game server is not artificially delayed. It can only make sense to change the setting in case of weak Internet connections with high packet loss. In this case, however, you should look for a better Internet connection because competitive gaming is certainly not possible with it.
Honest recommendation:
You have the skill, but your mouse doesn't support your aiming perfectly? Never struggle with your mouse grip again. Masakari and most pros rely on the Logitech G Pro X Superlight. See for yourself with this honest review written by Masakari or check out the technical details on Amazon right now.

A gaming mouse that fits you makes a significant difference!
CONTROLS
ACTIONS
ABILITIES
| Use/Eqip Ability: 1 | C |
| Use/Eqip Ability: 2 | Q |
| Use/Eqip Ability: 3 | E |
| Use/Eqip Ability: Ultimate | X |
MOVEMENT
| Forward | W |
| Back | S |
| Strafe Left | A |
| Strafe Right | D |
| Default Movement Mode | Run |
| Walk | Left Shift |
| Toggle Walk | Off |
| Jump | Space Bar |
| Crouch | Left Alt |
| Toggle Crouch | Off |
| Fly Up | Space Bar |
| Fly Down | Left Ctrl |
| Toggle Cheat: Ghost | key not assigned |
EQUIPMENT
WEAPONS
| Fire | Left Mouse Button |
| Alternate Fire | Right Mouse Button |
| Toggle Zoom Level | key not assigned |
| Aim Down Sights | Toggle |
| Sniper Rifle Aim | Toggle |
| Operator Zoom | Cycle |
| Auto Re-enter Scope | Off |
| Reload | R |
EQUIPMENT
| Equip Primary Weapon | 1 |
| Equip Secondary Weapon | 2 |
| Equip Melee Weapon | 3 |
| Equip Spike | 4 |
| Cycle to Next Weapon | key not assigned |
| Cycle to Previous Weapon | key not assigned |
| Drop Equipped Item | G |
| Equip Last Used Weapon | key not assigned |
| Auto-Equip Prioritizes | Most Recently Equipped |
| Don’t Auto-Equip Melee | not ticked |
INTERACTION
| Inspect Weapon | Y |
| Use Object | F |
| Use Spike (Plant or Defuse) | 4 or F |
| Use Spray | T |
Important explanations
Use Spike (Plant or Defuse): Make sure you assign this function so that you can comfortably and safely use the appropriate key because there is nothing more annoying than not being able to disarm the spike because you press the wrong key first and lose important time, plus you often have to fake to disarm to lure the opponent, and so on. In other words, this is one of the most important keys when it comes to crunch time.
COMMUNICATION
VOICE CHAT
| Party Voice Push To Talk Key | key not assigned |
| Team Voice Push To Talk Key | V |
| Party Voice Clutch Mute Key | key not assigned |
| Team Voice Clutch Mute Key | key not assigned |
Important explanations
I usually don’t use the in-game chat because I communicate with my mates in Teamspeak or Discord. There I don’t use push-to-talk. But if I am out and about with random teammates, then definitely with push-to-talk in the in-game chat. So,I can speak with my mates normally in Teamspeak/Discord and with random teammates with push-to-talk.
TEXT CHAT
| Tactical Callouts in Chat | Off |
| Explicit Language Filter | Off |
PINGS
| Ping (Tap) / Ping Wheel (Hold) | Z or Middle Mouse Button |
| Ping Wheel Hold Delay (milliseconds) | 130 |
| Ping: Caution | key not assigned |
| Ping: Watching Here | key not assigned |
| Ping: Need Support | key not assigned |
| Ping: On My Mark | key not assigned |
RADIO COMMANDS MENU
| Radio Commands Menu Index | Period |
| Combat Radio Commands Menu | key not assigned |
| Tactics Radio Command Menu | key not assigned |
| Social Radio Command Menu | key not assigned |
| Strategy Radio Command Menu | key not assigned |
RADIO COMMANDS WHEEL
| Radio Command Wheel Index | Comma |
| Combat/Tactics Radio Command Wheel | key not assigned |
| Social Radio Command Wheel | key not assigned |
| Strategy Radio Command Wheel | key not assigned |
INTERFACE
GENERAL
| Show Teammate Loadouts (Hold) | key not assigned |
| Combat Report | N |
| Agent Ability Tooltip | F1 |
| Open Armory | B |
| Open Map (Toggle) | key not assigned |
| Open Map (Hold) | ^ |
| Show Scoreboard (Hold) | Tab |
| Toggle Cursor | Equals |
VOTING
| Vote Option 1 | F5 |
| Vote Option 2 | F6 |
| Vote Option 3 | F7 |
| Vote Option 4 | F8 |
OBSERVER
| Toggle Free Camera | V |
| Toggle Minimap | Apostrophe |
| Toggle Sight Lines | R |
| All Outlines | H |
| Friendly Outlines | J |
| Enemy Outlines | K |
| No Outlines | L |
| Toggle Player Loadout Visibility | Period |
| Follow Projectiles | F |
| Cycle Preset Free Camera Locations | Equals |
| Hold to Observe Player in Free Camera | Left Shift |
| Follow Next Observer | Right Bracket |
| Follow Previous Observer | Left Bracket |
| Observe Player 1 | 1 |
| Observe Player 2 | 2 |
| Observe Player 3 | 3 |
| Observe Player 4 | 4 |
| Observe Player 5 | 5 |
| Observe Player 6 | 6 |
| Observe Player 7 | 7 |
| Observe Player 8 | 8 |
| Observe Player 9 | 9 |
| Observe Player 10 | 0 |
| Right Analog Rotation Speed X | 90 |
| Right Analog Rotation Speed Y | 70 |
| Right Analog Deadzone | 0.2 |
| Left Analog Deadzone | 0.25 |
| Gamepad Invert Look Y | Off |
CROSSHAIR
Crosshair preferences are very individual, and because Valorant allows you to configure your crosshairs so individually, many players change their crosshairs more often depending on the mood of the day.
In the default setting, I usually had a simple crosshair like in the following settings. Because I usually prefer the smallest crosshair that restricts my view as little as possible.
But there were also phases in which I preferred a cross as a crosshair again…I think every Valorant player knows that sometimes you just need variety, but you usually come back to your standard crosshair.
GENERAL

CROSSHAIR
| Use Advanced Options | On |
OTHER
| Show Spectated Player’s Crosshair | On |
| Fade Crosshair With Firing Error | Off |
| Disable Crosshair | Off |
PRIMARY
CROSSHAIR
| Crosshair Color | Green |
| Outlines | On |
| Outline Opacity | 0.5 |
| Outline Thickness | 1 |
| Center Dot | On |
| Center Dot Opacity | 1 |
| Center Dot Thickness | 4 |
| Override Firing Error Offset With Crosshair Offset | Off |
| Override All Primary Crosshairs With My Primary Crosshair | Off |
INNER LINES
| Show Inner Lines | On |
| Inner Line Opacity | 0.55 |
| Inner Line Length | 1 |
| Inner Line Thickness | 0 |
| Inner Line Offset | 8 |
| Movement Error | Off |
| Movement Error Multiplier | 1 |
| Firing Error | Off |
| Firing Error Multiplier | 1 |
OUTER LINES
| Show Outer Lines | On |
| Outer Line Opacity | 1 |
| Outer Line Length | 0 |
| Outer Line Thickness | 0 |
| Outer Line Offset | 0 |
| Movement Error | Off |
| Movement Error Multiplier | 1 |
| Firing Error | Off |
| Firing Error Multiplier | 1 |
AIM DOWN SIGHTS
| Copy Primary Crosshair | On |
SNIPER SCOPE
GENERAL
| Center Dot Color | Red |
| Center Dot | On |
| Center Dot Opacity | 0.75 |
| Center Dot Thickness | 1 |
VIDEO
GENERAL

| Display Mode | Fullscreen |
| Resolution | 1.920 x 1.080 16:9 (240Hz) |
| Monitor |
|
| Aspect Ratio Method | Letterbox |
| Limit FPS on Battery | Off |
| Max FPS on Battery | 60 |
| Limit FPS in Menus | On |
| Max FPS in Menus | 144 |
| Limit FPS in Background | Off |
| Max FPS in Background | 30 |
| Limit FPS Always | Off |
| Max FPS Always | 60 |
| NVIDIA Reflex Low Latency | On |
Important explanations
Limit FPS Always: If your system is not that powerful, limiting the FPS may be useful. If you need information on this topic, check out our article:

Capping your FPS in the menu, on the other hand, always makes sense since it simply saves energy, and more FPS won’t do you any good at this point. If you often tap out of the game to do other things on the side, the “Limit FPS in Background” function can also be interesting.
NVIDIA Reflex Low Latency: NVIDIA Reflex Low Latency can reduce the average latency by up to 30 ms, depending on all system components. This setting is most useful when your graphics card is already heavily loaded. However, the most important thing is that the “On” setting definitely brings no disadvantages and should always be enabled. Read the following article for more detailed information, especially about the “On+Boost” mode:
GRAPHICS QUALITY

| Multithreaded Rendering | On |
| Material Quality | Low |
| Texture Quality | Low |
| Detail Quality | Low |
| UI Quality | Low |
| Vignette | Off |
| VSync | Off |
| Anti-Aliasing | None |
| Anisotropic Filtering | 1x |
| Improve Clarity | Off |
| [BETA] Experimental Sharpening | Off |
| Bloom | Off |
| Distortion | Off |
| Cast Shadows | Off |
Important explanations
We have already dealt with the graphics settings in Valorant in various articles, so you can read the corresponding article for more information on the following options:
STATS

PERFORMANCE
| Client FPS | Text Only |
| Server Tick Rate | Text Only |
| Total Frame Time | Text Only |
| Idle Time | Hide |
| CPU (Game) Time | Hide |
| CPU (Render) Time | Hide |
| CPU (RHI) Time | Hide |
| GPU Render Time | Hide |
| Used Physical Memory | Hide |
| Available Physical Memory | Hide |
INPUT LATENCY
| Game Latency (CPU) | Text Only |
| Render Latency (GPU) | Text Only |
| Present Latency (CPU) | Hide |
| Game to Render Latency (CPU+GPU) | Text Only |
| Network RTT + Processing Delays | Hide |
NETWORK
| Network RTT | Text Only |
| Network RTT Jitter | Hide |
| Packet Loss | Text Only |
| Incoming Packet Loss | Hide |
| Outgoing Packet Loss | Hide |
| Packets Lost (Total) | Hide |
| Packets Receive Rate | Hide |
| Packets Send Rate | Hide |
| Uploaded Data | Hide |
| Out Packet Size | Hide |
GAMEPLAY STATS
| Shooting Error | Text Only |
AUDIO
SOUNDS

| Overall Volume | 100% |
| Sound Effects Volume | 100% |
| Voice-over Volume | 100% |
| Video Volume | 100% |
| All Music Overall Volume | 100% |
| Menu And Lobby Music Volume | 0% |
| Agent Select Music Volume | 0% |
| VOIP Ducks Music | not ticked |
| Mute Music When Game Window Out Of Focus | not ticked |
| Speaker Configuration | Stereo |
| Enable HRTF | ticked |
Important explanations
Enable HRTF: This is the most critical audio setting. Everything else is a matter of taste, but HRTF must be enabled to correctly locate sounds 360°. In this article, we have looked in more detail at HRTF On or Off in Valorant.
In the following article, we have dealt with all audio settings in Valorant in detail:
VOICE CHAT
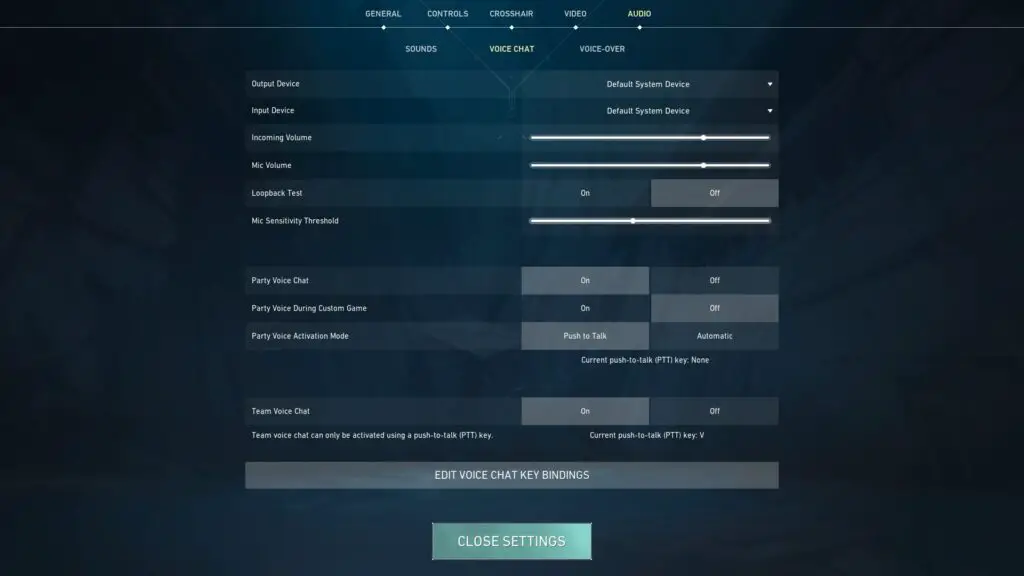
| Output Device | Default System Device |
| Input Device | Default System Device |
| Incoming Volume | 80% |
| Mic Volume | 80% |
| Loopback Test | Off |
| Mic Sensitivity Threshold | 40% |
| Party Voice Chat | On |
| Party Voice During Custom Game | Off |
| Party Voice Activation Mode | Push to Talk |
| Team Voice Chat | On |
VOICE-OVER

| Gameplay | ticked |
| Agent Flavor | ticked |
| Tactical Callouts | ticked |
| Announcer | ticked |
| VOIP Ducks Flavor VO | not ticked |
Final Thoughts
For some settings, depending on your system, other options may, of course, be useful.
It took me a long time to find the perfect settings for me, and I hope that with my help, you will find your ideal settings significantly faster so that you will be able to perform at your best.
If you have a question about the post or pro gaming in general, write us: contact@raiseyourskillz.com.
Masakari – moep, moep and out!

Former pro gamer Andreas "Masakari" Mamerow has been an active gamer for over 35 years, more than 20 of them in the competitive scene (Esports). In CS 1.5/1.6, PUBG and Valorant, he has led and coached teams at the highest level.
Old dogs bite better...