Besides the NVIDIA Control Settings, the in-game settings are probably the best way to improve the performance of your system without a hardware upgrade.
For me, it’s always about maximum performance, and I also accept quality losses as long as it doesn’t negatively affect my personal performance.
To that end, it’s important to note that these settings are the best for my system and therefore don’t automatically work equally well for everyone because you always have to consider the settings in combination with your monitor’s settings and the NVIDIA Control Settings.
I use a BenQ XL2546 with 240Hz. A monitor that is also used by many current pro gamers, as we could determine in our analysis in this article.
If you also have a BenQ XL2546 or want to get one, then maybe my Monitor Settings will help you, especially in combination with the following NVIDIA Control Settings.
If you are also interested in my NVIDIA Control Settings, you can find them in this article.
I have published all my settings in this article. I think it is clear that many settings are a matter of taste or habit, but there are certainly one or two you never thought about or looked deeper into.
With these settings, I have completed over 6,000 hours of play in PUBG and successfully competed in many national and international tournaments.
So I think my settings work very well as a starting point to find your personal best settings.
Let’s go!
Note: This article was written in English. Translations into other languages may not provide the same linguistic quality. We apologize for grammatical and semantic errors.
Graphics Settings
Language
| Language Setting | English |
Nvidia
| Highlights Auto Capture | Disable |
Display Settings
| Display Mode | Full Screen |
| Resolution | 1920*1080 |
| Lobby FPS Cap | 60 FPS |
| In-Game FPS Cap | Unlimited |
| Smoothed Frame Rate | Disable |
| Brightness | 80 |
| Universal Brightness for All Maps | Enable |

Important explanations
In-Game FPS Cap: If your system is not that powerful, limiting the FPS may be useful. If you need information on this topic, check out our article:

Advanced Settings
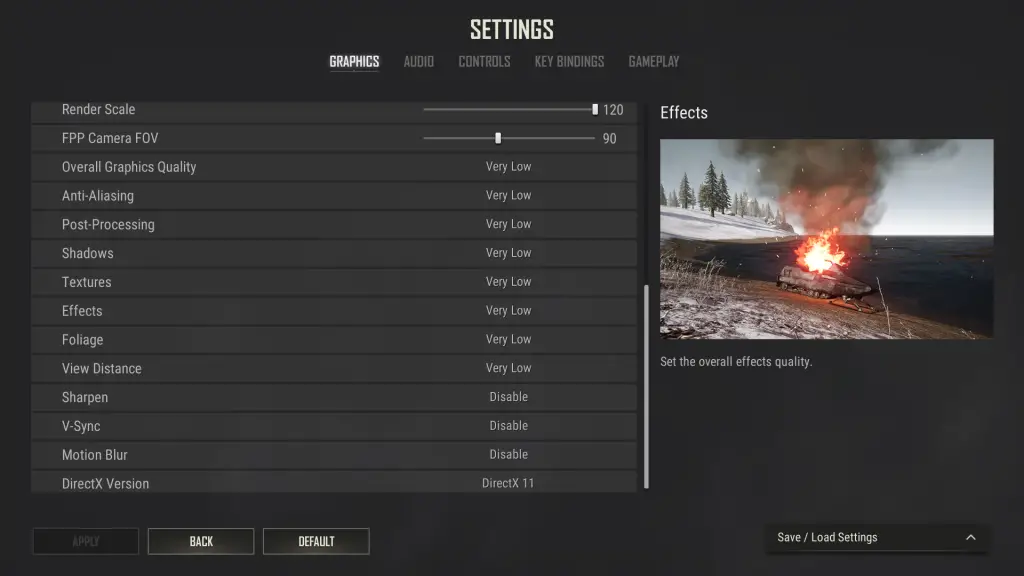
| Render Scale | 120 |
| FPP Camera FOV | 90 |
| Overall Graphics Quality | Very Low |
| Anti-Aliasing | Very Low |
| Post-Processing | Very Low |
| Shadows | Very Low |
| Textures | Very Low |
| Effects | Very Low |
| Foliage | Very Low |
| View Distance | Very Low |
| Sharpen | Disable |
| V-Sync | Disable |
| Motion Blur | Disable |
| DirectX Version | DirectX 11 |
Important explanations
Render Scale: This option artificially increases your resolution and can cost a lot of FPS. However, my system is strong enough to handle this, and I have found that this is the best way to see enemies in the landscape.
FPP Camera FOV: I also played with the value 103 for a long time, but in the meantime, I have settled on the value 90 because I can recognize enemies better and still have enough all-around visibility. Always remember that if you change this value, you also have to adjust the sensitivity.
Audio
Sound
| Master | Enable |
| Master Volume | 100 |
| Music | Disable |
| UI | Enable |
| UI Volume | 100 |
| Gameplay | Enable |
| Gameplay Volume | 100 |
| Emote Volume | 100 |
| Weapon Sound Effects | Remastered |
| HRTF | Enable |
Important explanations
HRTF: This is the most critical audio setting. Everything else is a matter of taste, but HRTF must be enabled to locate sounds 360° correctly.
Voice Chat
| Voice Input Mode | Disable |
| Voice Chat Channel | Team Only |

Controls
Mouse
| Invert Mouse | Disable |
| General Sensitivity | 31 |
| Vertical Sensitivity Multiplier | 1 |
| Aim Sensitivity | 31 |
| ADS Sensitivity | 27 |
| Scoping Sensitivity | 31 |
| Universal Sensitivity for All Scopes | Enable |
Important explanations
Sensitivity: To be able to classify the sensitivity correctly, I’ll give you the following additional information. I use a Logitech G Pro X Superlight mouse with 800 DPI.
Key Input Method
| Crouch | Toggle |
| Prone | Toggle |
| Walk | Hold |
| Sprint | Hold |
| Free Look | Hold |
| Hold Breath | Toggle |
| Canted Sights | Toggle |
| Peek | Hold |
| Map | Hold |
| Aim | Hold |
| ADS | Toggle |
Important explanations
ADS: A lot of gamers use Hold, and that has its advantages. However, I have noticed that holding down the right button affects my aiming, so I use Toggle. If you use a heavier mouse than the Logitech G Pro X Superlight, it probably won’t affect your aiming as much.
Key Bindings
Common
| Move Forward | W |
| Move Backward | S |
| Strafe Left | A |
| Strafe Right | D |
| Walk | Mouse thumb button left 1 |
| Sprint | Shift |
| Jump/Vault | not assigned |
| Jump Only | Q |
| Vault Only | C |
| Crouch | Alt-left |
| Prone | Y alt. Z (depending on keyboard language) |
| Interact | F |
| Toggle Perspective | V |
| Auto Run | = |
| Free Look | Mouse thumb button left 2 |
Important explanations
Jump/Vault: It is essential to assign both functions separately to prevent accidental vaulting or similar.
Combat
| Fire | left mouse button |
| Aim/Ads | not assigned |
| Aim | Mouse thumb button left 1 |
| ADS | right mouse button |
| Toggle Canted Sights | Alt + right mouse button |
| Reload | R |
| Next Weapon | not assigned |
| Previous Weapon | not assigned |
| Primary Weapon 1 | 1 |
| Primary Weapon 2 | 2 |
| Secondary Weapon | 4 |
| Melee Weapon | 5 |
| Throwables | E |
| Cycle Firing Mode | B |
| Peek Left | L Ctrl |
| Peek Right | Spacebar |
| Holster Weapons | 3 |
| Equip Frag Grenade | G |
| Equip Stun Grenade | not assigned |
| Equip Smoke Grenade | not assigned |
| Equip Molotov Cocktail | not assigned |
| Equip Decoy Grenade | not assigned |
| Equip Spike Trap | not assigned |
| Equip Sticky Bomb | not assigned |
| Equip C4 | not assigned |
| Inspect Weapon | J |
| Radio Message Wheel | Middle mouse button (mouse wheel) |
Important explanations
Aim/Ads: If you assign the two functions separately, the ADS reacts faster.
Peek Left / Peek Right: This setting is very special to me. If you are used to the standard Peek settings, don’t change them. If you have problems with the default assignment Q / E like me, try my solution, this leads, of course, to the fact that one also needs various other assignments with me, e.g., Q = Jump.
ADS
| Scope Zoom In | Mouse wheel forward |
| Scoop Zoom Out | Mouse wheel backward |
| Increase Zeroing / Next Reticle Type | Page Up |
| Decrease Zeroing / Previous Reticle Type | Page Down |
| Reset Zeroing / Reset Reticle Type | Middle mouse button (mouse wheel) |
| Increase Reticle Brightness | Mouse wheel forward |
| Decrease Reticle Brightness | Mouse wheel backward |
| Hold Breath | Shift |
Throwing
| Toggle Throwing Stance | right mouse button |
| Cook Grenade | R |
Item
| Use Med Kit | F3 |
| Use First Aid Kit | F1 |
| Use Bandage | F2 |
| Use Heal Item | not assigned |
| Use Adrenaline Syringe | not assigned |
| Use Painkiller | not assigned |
| Use Energy Drink | not assigned |
| Use Boost Item | not assigned |
Vehicle
| Accelerate | W |
| Brake / Reverse | S |
| Steer Left | A |
| Steer Right | D |
| Handbrake / Vehicle Jump | right mouse button |
| Boost | Shift |
| Toggle Ignition | E |
| Horn / Aerial Stunt | left mouse button |
| Re-skin Vehicle | L |
| Toggle Vehicle Music | F5 |
| Change Vehicle Music | F6 |
| Increase Vehicle Music Volume | Mouse wheel forward |
| Decrease Vehicle Music Volume | Mouse wheel backward |
Motorcycle
| Air Control – Lean Back | Spacebar |
| Air Control – Lean Forward | L CTRL |
| Air Control – Lean Right | E |
| Air Control – Lean Left | Q |
Dirt Bike
| Ground Pitch Up | Shift |
| Ground Pitch Down | L CTRL |
Motor Glider
| Increase Throttle | Shift |
| Decrease Throttle | L CTRL |
| Pitch Down | W |
| Pitch Up | S |
| Roll Left | A |
| Roll Right | D |
Vehicle Seats
| Vehicle Driver’s Seat | Mouse thumb button left 1 |
| Move to Vehicle Seat 2 | Mouse thumb button left 2 |
| Move to Vehicle Seat 3 | CTRL + 3 |
| Move to Vehicle Seat 4 | CTRL + 4 |
| Move to Vehicle Seat 5 | CTRL + 5 |
| Move to Vehicle Seat 6 | CTRL + 6 |
| Move to Vehicle Seat 7 | CTRL + 7 |
| Move to Vehicle Seat 8 | CTRL + 8 |
| Move to Vehicle Seat 9 | CTRL + 9 |
| Move to Vehicle Seat 10 | CTRL + 0 |
Important explanations
Vehicle Driver’s Seat / Move to Vehicle Seat 2: Quickly changing vehicle seats can be crucial, so choose buttons here that you can use quickly at any time. Important for a drive-by or when you need to get into a vehicle under pressure to escape quickly.
Swimming
| Swim Up | Spacebar |
| Dive | C |
UI
| World Map | ^ |
| Mark my Location | INS |
| Delete Marker | DEL |
| Extended Minimap | N |
| Quick Marker | left mouse button |
| Inventory | Tab |
| Select Item Quantity | L CTRL |
| Throwable Items Wheel | not assigned |
| Heal Items Wheel | not assigned |
| Action Wheel | not assigned |
| Toggle UI | CTRL + U |
| Toggle Key Guide | ALT + K |
| Settings | not assigned |
| Chat Window | Enter |
Emote / Spray Shortcut
nichts belegt
Sound
| Push to Talk | T |
| Mute Voice Chat | CTRL + T |
| Cycle Voice Channels | CTRL + Y |
| Mute Master Volume | CTRL + M |
| Instant Volume Reducer | F7 |
Important explanations
Instant Volume Reducer: Especially in vehicles, the game sounds are sometimes so loud that communication with team members is challenging. With this option, you can reduce the sound and continue to discuss tactics with your colleagues via Teamspeak/Discord.
Spectator Mode
| Next Player | Page Up |
| Previous Player | Page Down |
| Report Player | R |
Observer Mode
| Spectator Cam | left mouse button |
| Follow Cam | right mouse button |
| Free Cam | Spacebar |
| Third Person Spectate | Y |
| Cam Zoom Reset | Middle mouse button |
| Free Cam Ascend | E |
| Free Cam Descend | Q |
| Increase Camera Speed | L CTRL |
| Smooth Free Cam | K |
| Toggle Player Tag | CTRL + H |
| Toggle Player Stats | ALT + S |
| Increase Player Tag Visibility Range | not assigned |
| Decrease Player Tag Visibility Range | not assigned |
| Toggle X-Ray | X |
| Player List | Tab |
| Show Care Package | I |
| Toggle Damage Indicator | ALT + D |
| Toggle Tracer Visibility | Backspace |
| Tracer Team Color | Shift + Backspace |
| Tracer Display Mode | CTRL + Backspace |
| Toggle World Map Team Logos | NUM + |
| Action Spectator | CTRL + Z |
| Switch to Attacking Player | CTRL + X |
Observer Presets
not assigned
Replay
| Toggle Timeline | J |
| Play / Pause | P |
| Increase Play Speed | Arrow key up |
| Decrease Play Speed | Down arrow key |
| Return to Recorded Player | B |
Gameplay
UI
| Inventory Character Render | Disable |
| Color Blind Mode | Protanopia |
| Crosshair Color | Custom |
| Crosshair Color – Red | 255 |
| Crosshair Color – Green | 0 |
| Crosshair Color – Blue | 0 |
| Crosshair Color – Alpha | 255 |
| Weapon Slot HUD | Enable |
| World Map Zoom Sensitivity | 10 |
| Minimap Desaturation | Enable |
| Minimap Dynamic Zoom | Enable |
| Killfeed Limit | 10 |
| Hide Nicknames in Killfeed | Disable |
| Interaction Target Highlight | Enable |
| Compass Background | Disable |
| On-Screen Key Guide | Disable |
| Loot Flash Effect | Glow |
| Display Whispers While in a Match | Enable |

Important explanations
Color Blind Mode: Try out all the variations here. The change in the color of the blood is particularly interesting. Depending on your other graphics settings, you may perceive some blood colors better and thus be able to track better whether you hit your opponent.
Functionalities
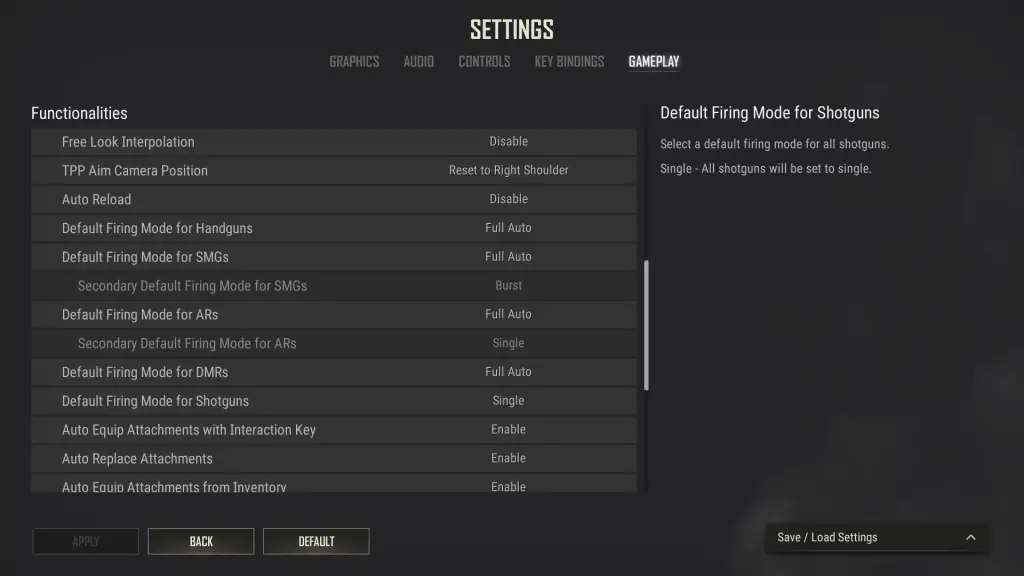
| Free Look Interpolation | Disable |
| TPP Aim Camera Position | Reset to Right Shoulder |
| Auto Reload | Disable |
| Default Firing Mode for Handguns | Full Auto |
| Default Firing Mode for SMGs | Full Auto |
| Default Firing Mode for ARs | Full Auto |
| Default Firing Mode for DMRs | Full Auto |
| Default Firing Mode for Shotguns | Single |
| Auto Equip Attachments with Interaction Key | Enable |
| Auto Replace Attachments | Enable |
| Auto Equip Attachments from Inventory | Enable |
| Auto Replace Weapon Skin | Enable |
| Hide Helmet | Enable |
| Livestream Screens | Enable |
| Additional Action Queuing | Disable |
| Highlight Recommended Ammo | Enable |
| Highlight Recommended Equipment | Enable |
Replay
| Replay | Enable |
| Death Cam | Disable |
Important explanations
Replay: The use of replays can (as far as I know) lead to stuttering, but it is usually mandatory if you play competitive PUBG and is absolutely necessary, especially for analyzing your own game. I never had any problems when recording replays.
Death Cam: However, the Death Cam is superfluous and can also lead to problems.
Network
| Network Debug Statistics | Disable |
Important explanations
Network Debug Statistics: Showing the statistics can make sense, especially if you have problems with your internet connection and are trying to solve them. My system and fiber line are running fine, so I don’t need the statistics, and since everything always eats at least minimal resources, I usually turn this option off.

Honest recommendation:
You have the skill, but your mouse doesn't support your aiming perfectly? Never struggle with your mouse grip again. Masakari and most pros rely on the Logitech G Pro X Superlight. See for yourself with this honest review written by Masakari or check out the technical details on Amazon right now.

A gaming mouse that fits you makes a significant difference!
Final Thoughts
For some settings, depending on your system, other options may, of course, be useful.
It took me a long time to find the perfect settings for me, and I hope that with my help, you will find your perfect settings significantly faster so that you can perform at your best.
If you have a question about the post or pro gaming in general, write us: contact@raiseyourskillz.com
Masakari – moep, moep and out!

Former pro gamer Andreas "Masakari" Mamerow has been an active gamer for over 35 years, more than 20 of them in the competitive scene (Esports). In CS 1.5/1.6, PUBG and Valorant, he has led and coached teams at the highest level.
Old dogs bite better...